If you’re just starting out or even refining your setup, the right telescope accessories can completely transform your stargazing experience. From sharper planetary views to easier alignment and greater comfort, these tools aren’t just add-ons — they can be game-changers.
In this guide, we’ll explore the most useful accessories for clearer, more enjoyable observing, with practical tips for beginners and seasoned sky-watchers alike.
⭐ Quick TL;DR – Telescope Accessories
Beginner? Here’s the short version: the accessories that make the biggest difference, in order of impact.
- 🔭 2× Barlow: Doubles magnification instantly. Moon & planets.
- 👁️ Moon Filter: Cuts glare & reveals lunar detail.
- 🎯 Red-Dot Finder: Aim quickly and easily.
- 🔍 Wide-Angle Eyepiece: Brighter, wider views of clusters & nebulae.
- 💡 LPR Filter: Reduces city light pollution.
- 🪞 Diagonal: Comfortable viewing angle for refractors/SCTs.
- 🔧 Laser Collimator: Keeps reflectors’ mirrors perfectly aligned.
Quick Navigation
- How To Choose The Right Accessories
- Barlow Lenses
- Eyepieces
- Finderscopes & Red Dot Finders
- Diagonals
- Filters
- Collimators
- Frequently Asked Questions
How to Choose the Right Accessories
Not every telescope accessory fits every setup. What you need depends on your telescope type, observing goals, and budget.
- Refractors – benefit from diagonals and colour filters.
- Reflectors – may need a collimator and a good set of eyepieces.
- Catadioptrics (SCTs) – work well with diagonals, Barlows, and dew shields.
- Urban observers – should prioritize light pollution filters.
Tip: Before upgrading, think about what’s currently limiting your experience — is it brightness, magnification, comfort, or alignment? That’ll tell you what to buy next.
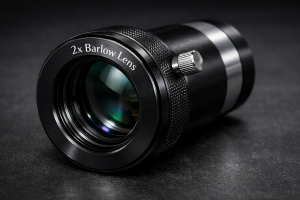
Barlow Lenses – Bigger Views for Less
The Barlow lens, invented by English mathematician Peter Barlow (1776–1862), is one of the most cost-effective upgrades you can buy. It increases magnification without needing extra eyepieces — a must-have for any budding astronomer.
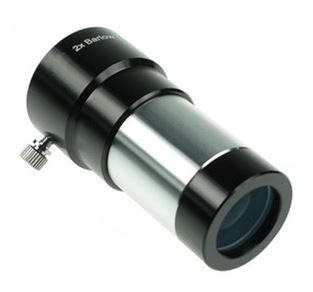
A Barlow is a concave lens in a tube that sits between your telescope and eyepiece. It effectively lengthens your telescope’s focal length, boosting magnification.
- The most common Barlows provide 2× magnification, though 3× versions exist.
- With a 2× Barlow, each eyepiece you own instantly becomes two.
If your telescope is under 8″, a 2× Barlow is ideal. A 3× Barlow may dim images too much because smaller scopes gather less light.
Tip: Always match the Barlow size (1.25″ or 2″) to your eyepiece barrel.
Common Mistake: Stacking multiple Barlows — this often causes distortion.
check out the best barlow lenses
Eyepieces
Eyepieces can completely change your telescope’s performance. Most telescopes include one or two basic ones, but upgrading to higher-quality eyepieces is one of the best investments you can make.
A good eyepiece can make your views sharper, brighter, and more comfortable — often making it feel like you’ve upgraded your telescope itself.
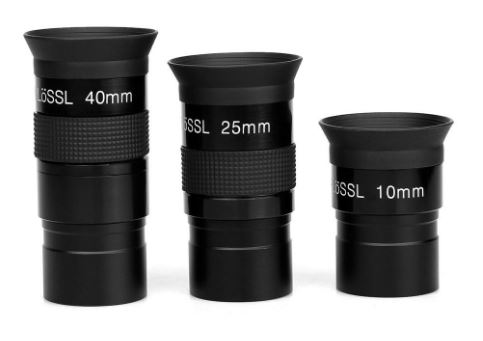
Key points to remember:
- Eyepieces determine your magnification and field of view.
- Use lower magnifications (longer focal lengths) for deep-sky objects like nebulae or galaxies — they appear larger and fainter.
- Use higher magnifications (shorter focal lengths) for planets and the Moon, which are bright and small.
Avoid duplication:
If you have a 28 mm eyepiece and a 2× Barlow, that setup already gives you the equivalent of 14 mm. Buying a 14 mm eyepiece later would be redundant.
Most eyepieces, (just like Barlows), come in 1.25″ or 2″ formats — just make sure they match your scope.
Discover the best telescope eyepieces for stargazing
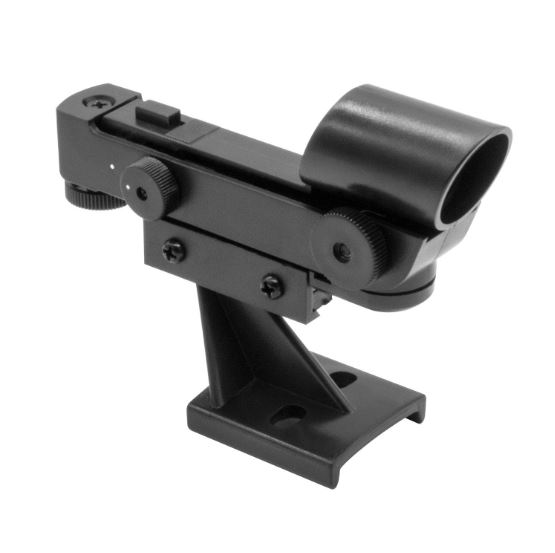
Finderscopes/Red Dot Finders
Finderscopes/Red Dot Finders are a must have for beginners and experienced stargazers alike. They often come as part of the deal and their purpose is to aim the telescope at the object of interest.
Finderscopes
These small auxiliary scopes provide very low magnification, giving a wider field of view. Once an object is centered in the finderscope’s crosshairs, it should appear in your main scope.

Red Dot Finders
Increasingly popular, these use a projected red dot on a glass window to show where your telescope is pointing. The red dot acts as a virtual crosshair and makes alignment fast and intuitive.
Both types are easily fitted to the telescope along the same line of sight but must be aligned properly with the main telescope before use, which is a simple process.
Both types mount along your telescope’s main optical axis and must be aligned before use — a quick process that pays off during observing sessions.
Tip: Align your finder in daylight by aiming both it and your main scope at a distant object like a TV aerial or tree top. It’ll save time under the stars.
Discover some of the top finderscopes for telescopes
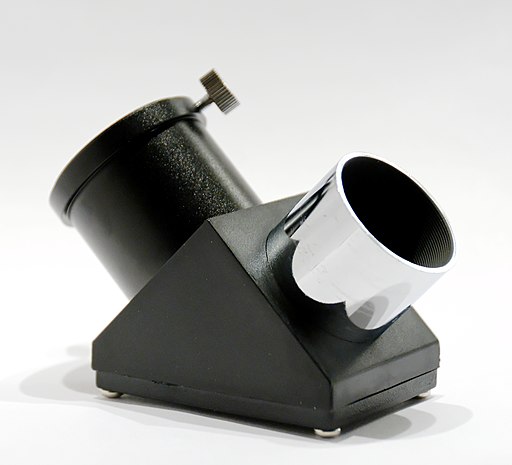
Diagonals
If you use a refractor or catadioptric telescope, a diagonal (sometimes called a star diagonal ) is a must. Without one, you’ll find yourself bent awkwardly when the scope points high in the sky.
A diagonal fits between your telescope and eyepiece, deflecting light by 90° for a comfortable viewing angle.

The diagonal come in two varieties, mirror and prism.
Mirror Diagonal
- Older design; affordable and colour-accurate.
- Can have slightly reduced contrast unless using a dielectric mirror (premium version).
Prism Diagonal
- Offers higher contrast and brightness, but can cause chromatic aberration with short-focal-length scopes.
- Best for longer focal length refractors or SCTs. (Schmidt-Cassegrain telescopes)
Both types are available in 1.25″ and 2″ sizes. Match them to your telescope’s focuser.
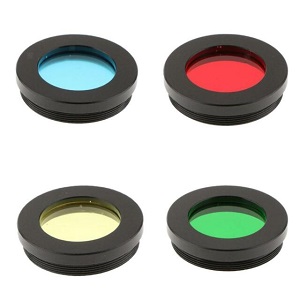
Filters
It might sound odd to block light in astronomy — but the right filters can dramatically enhance detail and contrast in celestial objects. Different filters isolate specific wavelengths of light, helping your eyes pick out features you’d otherwise miss.
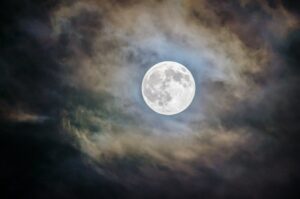
Moon Filters
The Moon is dazzlingly bright, especially at or near full phase. Filters reduce glare and bring out subtle detail.
- Neutral Density Filters: Reduce light evenly; affordable and simple.
- Polarizing Filters: Adjustable — twist to vary brightness. Great for changing lunar phases.
Tip: Use around 25–40% transmission for comfort; too dark, and you’ll lose fine detail.

check out the best moon filters
Planet Filters
Planets reflect different wavelengths of light, so colour filters can make subtle features stand out — cloud bands on Jupiter, Martian ice caps, or Saturn’s rings.
- Use red, yellow, green, and blue filters for contrast enhancement.
- Filters follow the Wratten numbering system (e.g., #21 Orange, #47 Violet).

Quick reference:
- Mars → Red or Orange (#21, #23A)
- Jupiter/Saturn → Blue (#80A)
- Venus → Green or Yellow (#11, #15)
- Moon → Neutral Density or Polarizing
Tip: For smaller telescopes (<6″), use lighter filters to avoid dimming the image too much.
Deep Sky Filters
If observing deep sky objects is your thing, you live in an urban area and you only ever buy one filter for your telescope, a Light Pollution Reduction filter (LPR) is probably the one for you.
If you’re battling light pollution, these are essential.
- LPR (Light Pollution Reduction) Filters: Block common urban light wavelengths — great for city observing.
- Narrowband Filters: Best for dark-sky sites. They isolate key emission lines (H-beta, O-III), making nebulae “pop” against a darker background.
Both types screw into the eyepiece and are easy to swap.

Even though the elimination of all light pollution is impossible, an LPR filter does a good job of reducing the effects of the most common types of street lighting illumination.
Narrowband filters are often regarded as the best all round filter for deep sky observations. This distinction is more relevant if you happen to live in a rural area, because the narrowband filter is best suited to dark skies with good seeing conditions.
A narrowband filter blocks out all light apart from a small range of wavelengths. This can have a noticeable effect on reducing sky glow and darkening the sky. When observing Nebulae, what may have been faint or unspectacular before can suddenly come to life with the use of a narrowband filter.

Telescope filters are usually threaded and screw into the barrel of your eyepiece. This makes them very easy to use. It’s also completely different to how solar filters attach to your scope, and we’ll look at them next.
Solar Filters
Solar filters differ from other filters in that they don’t attach to the eyepiece. (If you ever come across one that says it does avoid it like the plague!).
The reason for this is that the telescope will concentrate and focus too much sunlight before it reaches the filter. This will in all likelihood damage the filter and your eyes!
Serious Warning! Please don’t look through a telescope (or it’s finderscope!) at the Sun without the correct filter. It can cause serious eye damage and even permanent blindness.
The only safe filters are those that fit securely over the front of your telescope’s aperture, blocking 99.999% of light.
- White Light Filters: Reveal sunspots and surface granulation (Photosphere).
- Hydrogen-Alpha Filters: Show stunning prominences and flares in the Chromosphere.
Collimators
If you own a Newtonian Reflector then over time you may find that the primary and secondary mirrors, due to the odd knock or bump, become misaligned. In which case the optical components need to be properly aligned with one another. This process is called collimation.
To make the process easier, there is a popular tool called a Laser Collimator you can use when collimating your telescope. This greatly helps with the process and gives much quicker results.
It is possible to manually collimate a reflector, but the method takes some experience and isn’t the best choice for beginners.

Tip: Even if your scope is factory-aligned, check collimation every few sessions — especially after travel or storage.
Quick-Pick Summary
| Accessory | Best For | Why You’ll Love It |
|---|---|---|
| 2× Barlow Lens | Planets & Moon | Doubles magnification instantly |
| Wide-Angle Eyepiece | Deep-Sky Objects | Wider, brighter views |
| Red-Dot Finder | Quick Alignment | Easy target acquisition |
| Diagonal | Refractors/SCTs | Comfortable viewing angle |
| LPR Filter | Urban Observers | Cuts light pollution |
| Laser Collimator | Reflectors | Fast, precise mirror alignment |
Final Thoughts
The right accessories can make all the difference to a telescope setup. Whether it’s the crisp detail from a Barlow lens, the comfort of a diagonal, or the magic of your first filtered nebula — these small upgrades can transform your nights under the stars.
Wishing you clear skies and happy observing!
FAQ Questions & Answers
What are the essential telescope accessories for beginners?
Beginners should focus on eyepieces, Barlow lenses, finderscopes or red dot finders, diagonals, and filters. These enhance clarity, comfort, and viewing range without overwhelming new users.
Do I need a Barlow lens if I already have multiple eyepieces?
A Barlow lens doubles or triples the magnification of each eyepiece. This is often more cost-effective than buying multiple additional eyepieces and allows flexibility for viewing planets and deep-sky objects.
What is the difference between a finderscope and a red dot finder?
Finderscopes provide a low-power view with crosshairs to center objects, while red dot finders project a virtual crosshair onto a glass window for intuitive aiming. Both help beginners locate objects more easily.
Are filters necessary for beginner stargazing?
Filters, such as Moon or light pollution filters, are optional but can greatly improve viewing quality. They reduce glare, enhance contrast, and help see details in bright objects or areas affected by city lights.
How do I know which accessories suit my telescope type?
- Refractors: Diagonals and colour filters are helpful.
- Reflectors: Collimators and good eyepieces improve performance.
- Catadioptrics (SCTs): Barlows, diagonals, and dew shields are useful.
Have you ever thought about photographing the night sky? Check out our guide Astrophotography for beginners