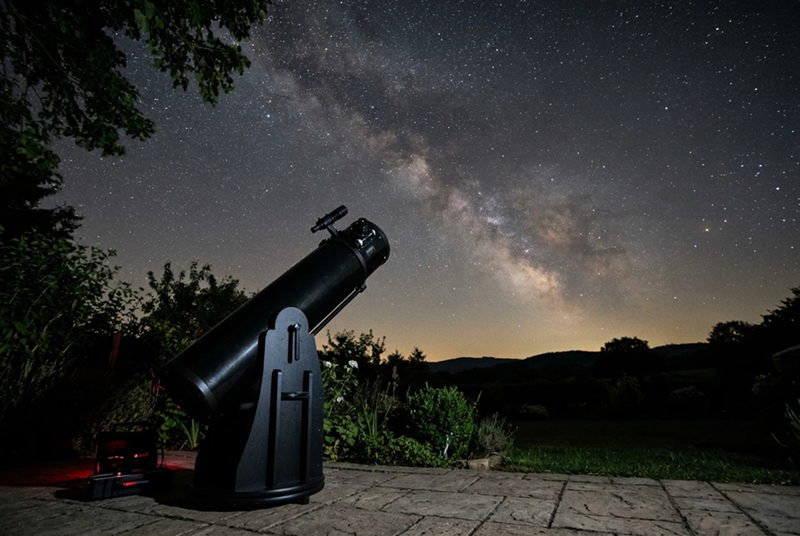
Have you ever looked through your telescope and wondered why the stars don’t appear as sharp as they should? If you own a reflecting telescope, particularly a Newtonian or Dobsonian, the problem could be poor collimation.
Collimation is the process of aligning a telescope’s optical components so that they work together correctly. When the mirrors in a reflecting telescope are properly aligned, the telescope can deliver the sharp, detailed views it’s designed to provide.
The good news is that checking collimation is a skill most Newtonian telescope owners can learn. You don’t necessarily need expensive equipment, and a simple collimation cap can be enough to get you started.
However, not every telescope needs the same treatment. Newtonian reflectors sometimes require adjustment, while refractors and many other telescope designs generally hold their factory alignment well. Knowing which type of telescope you own is therefore the best place to start.
In this guide, we’ll explain what collimation means, how to recognise when it might be necessary, which tools are available, and how to approach the process safely. We’ll concentrate on Newtonian reflectors, including most Dobsonian telescopes, while explaining what owners of other designs need to know.
Quick Answer: Does Your Telescope Need Collimation
It depends on the type of telescope you own
- Newtonian reflectors and most Dobsonian telescopes: These can lose alignment through transport or handling, so checking collimation regularly is worthwhile. Adjustment is only necessary when the alignment requires it.
- Schmidt–Cassegrain telescopes (SCTs): These usually hold their alignment well but may occasionally need a small adjustment, typically assessed using a star test.
- Refractors: These are normally factory-aligned and rarely require routine user collimation.
- Maksutov–Cassegrain telescopes: These generally hold their alignment well, and the adjustment options vary by model. Consult the manufacturer’s instructions before attempting any adjustment.
If you own a Newtonian reflector, a collimation cap or a suitable Cheshire tool can help you check its alignment. A laser collimator is another option, but it isn’t essential for every beginner.
Before adjusting anything, make sure poor collimation could be causing the problem. Atmospheric turbulence, insufficient cooling, inaccurate focusing and other factors can also produce soft or blurry views.
1. What Is Telescope Collimation?
Telescope collimation is the process of aligning the optical components so that light travels through the telescope along the intended optical path and forms the best possible image.
The exact process depends on the telescope’s design.
In a Newtonian reflector, light enters the open end of the telescope tube and travels to the large primary mirror at the back. That mirror reflects the light towards a smaller secondary mirror, which directs it into the focuser and eyepiece.
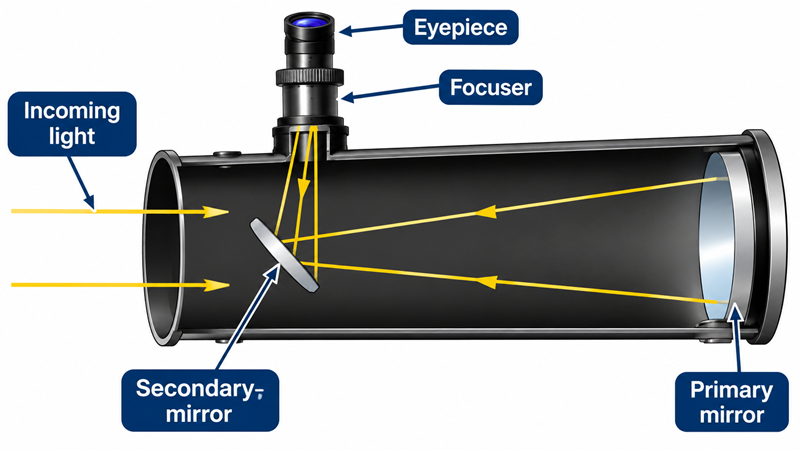
For the telescope to perform properly, the mirrors must be aligned correctly relative to the focuser. If their alignment is significantly off, the telescope may struggle to produce the sharp images you would otherwise expect.
Collimation is not the same as focusing. Focusing brings the image into sharpness by adjusting the focuser, while collimation ensures that the optical components are correctly aligned in the first place.
It’s also different from aligning a finderscope. A finderscope must point towards the same part of the sky as the main telescope, but that adjustment does not correct the alignment of the telescope’s mirrors.
Fortunately, a Newtonian reflector doesn’t necessarily need adjusting every time you use it. Some telescopes hold their alignment very well, while others need more frequent checks, particularly after being transported.
The aim is not to keep turning adjustment screws until everything looks right. It’s to check the alignment, make only the adjustments needed, and confirm that the telescope is performing as it should.
2. Which Telescopes Need Collimation?
Not all telescopes need collimation to the same extent. The optical design determines how the telescope is aligned, how well it holds that alignment, and whether routine adjustment is something the owner should attempt.
Here’s what you need to know about the main types of telescopes.
Newtonian Reflectors and Dobsonian Telescopes
Newtonian reflectors are the main type of telescope for which learning to collimate is particularly useful.
These telescopes use two mirrors: a large primary mirror at the back of the tube and a smaller secondary mirror near the front. Both must be correctly aligned for the telescope to deliver its best performance.
Transport, handling and normal use can gradually affect their alignment. Some Newtonians hold collimation very well, while others need more frequent checks.
Most Dobsonian telescopes use Newtonian reflector optics, so the same basic collimation principles apply. Whether you have a compact tabletop Dobsonian or a larger floor-standing model, it’s worth learning how to check the alignment.
The good news is that you don’t necessarily need to adjust the mirrors every time you observe. Check the alignment periodically and after transporting the telescope, then make adjustments only when necessary.
We’ll cover the process step by step in Section 5.
Schmidt–Cassegrain Telescopes (SCTs)
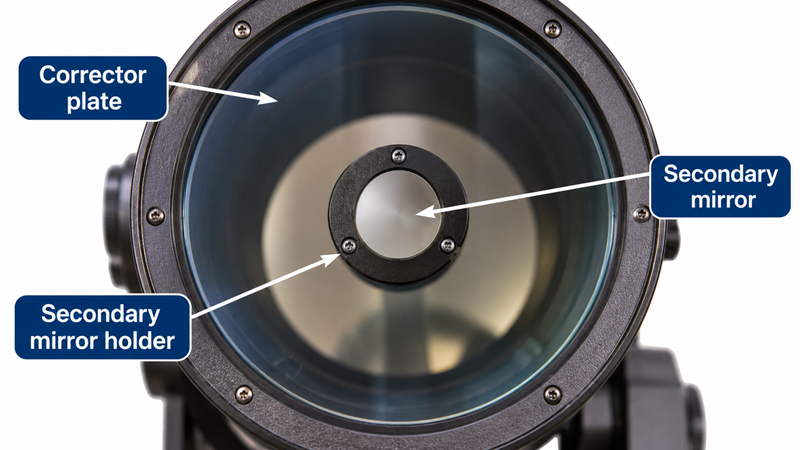
Schmidt–Cassegrain telescopes use a combination of mirrors and a corrector plate to provide a relatively compact optical design.
They generally hold their alignment well and don’t normally require frequent adjustment. However, a small change in the secondary mirror’s alignment can affect image quality, particularly when observing planets or other objects at high magnification.
Collimation is usually checked using a carefully performed star test, with any adjustment made according to the manufacturer’s instructions.
If you own an SCT, resist the temptation to adjust the optics simply because an image looks blurry. Atmospheric turbulence, poor focus and inadequate cooling can produce similar symptoms.
Refractor Telescopes
Refractors use lenses rather than mirrors to gather and focus light.
They are normally aligned at the factory and tend to hold their alignment well. Most refractor owners will never need to collimate their telescope themselves.
If a refractor consistently produces poor images despite accurate focusing and suitable observing conditions, there may be an optical alignment problem. However, this isn’t necessarily something the owner should attempt to correct.
The adjustment mechanisms vary between models, and some refractors have no provision for user collimation. Consult the manufacturer’s manual or seek advice from a qualified telescope technician before attempting any adjustment.
Maksutov–Cassegrain Telescopes
Maksutov–Cassegrain telescopes are another compact design, using mirrors alongside a curved front corrector.
Like refractors and Schmidt–Cassegrains, they generally hold their alignment well and rarely need routine adjustment.
However, their construction and adjustment mechanisms vary. Some models have accessible collimation adjustments, while others are not designed for routine user adjustment.
If you suspect a problem, consult the manual for your particular telescope before attempting to change anything. Unnecessary adjustments can make matters worse rather than improve the view.
What About Other Reflecting Telescopes?
Not every reflecting telescope follows the Newtonian design. For example, classical Cassegrain telescopes and other specialised reflector designs have their own alignment requirements.
If your telescope doesn’t fit neatly into one of the categories above, check its manual before following a collimation procedure intended for a Newtonian.
The most important thing to remember is that collimation requirements depend on your telescope’s design. If you own a Newtonian reflector or a conventional Dobsonian, learning to check the mirror alignment is a useful skill. Other telescope designs generally need less frequent adjustment, and some are best left to a technician if an alignment problem is suspected.
So how can you tell whether your telescope actually needs attention? In the next section, we’ll look at the signs of poor collimation and how to distinguish them from other causes of blurry images.
3. How Do You Know If Your Telescope Needs Collimation?
Poor collimation can reduce the sharpness and detail your telescope delivers, particularly when observing the Moon, planets and double stars at higher magnifications. However, a blurry image doesn’t automatically mean your telescope needs collimation.
Before adjusting anything, it’s worth checking for a few telltale signs and ruling out other common causes of poor views.
Signs That Your Telescope May Need Collimation
1. Stars don’t look symmetrical
When a telescope is properly focused and well aligned, stars should generally appear as small, sharp points, although their appearance depends on the telescope’s aperture, magnification and observing conditions.
If stars near the centre of the field consistently appear distorted or asymmetrical, poor collimation may be contributing to the problem. However, optical defects and poor atmospheric seeing can produce similar effects, so this symptom alone isn’t conclusive.
2. Planetary details look less sharp than expected
If Jupiter’s cloud bands or Saturn’s rings appear less distinct than they should, misalignment could be one possible explanation.
This is particularly worth investigating if your Newtonian telescope previously delivered sharper views under comparable conditions. However, atmospheric turbulence, inaccurate focusing and excessive magnification can also reduce planetary detail.
3. A star looks asymmetrical when slightly out of focus
A star test can help you assess optical alignment.
To perform a basic check, allow your telescope to reach the outdoor temperature, choose a reasonably bright star well above the horizon, and centre it in the eyepiece. Use an appropriate magnification and move the focuser slightly away from the point of sharp focus.
In a suitable star test, the star expands into a circular pattern. On a telescope with a central obstruction, such as a Newtonian reflector or Schmidt–Cassegrain, you’ll usually see a central shadow surrounded by a brighter ring-like pattern.
If the central shadow appears noticeably off-centre within the surrounding pattern, collimation may need attention.
However, the pattern must be interpreted carefully. Atmospheric turbulence and temperature differences within the telescope can distort the view, and different optical designs require different interpretations. A star test is a useful diagnostic, but it isn’t a substitute for checking a Newtonian’s alignment with a suitable collimation tool.
4. Your telescope has been transported or knocked
Moving a telescope can disturb its alignment, particularly if it has been carried over uneven ground or transported in a vehicle.
This doesn’t mean that collimation will necessarily have changed. Some telescopes hold their alignment extremely well, while others are more sensitive to movement.
If you own a Newtonian reflector, checking collimation after transport is a sensible precaution. If the telescope has suffered a significant impact, inspect it carefully and consult the manufacturer’s guidance before attempting any adjustments.
Before You Adjust Anything: Check These Three Things
Not every disappointing view is caused by poor collimation. Before reaching for your adjustment screws, consider the following possibilities.
Atmospheric seeing
The atmosphere is constantly moving, and changes in air temperature and density can distort incoming light. This can make stars twinkle, planets shimmer, and fine details difficult to see.
If the image fluctuates rapidly or appears to boil, atmospheric turbulence may be responsible. Try observing again when conditions are steadier.
Telescope cooling
A telescope brought from a warm house into cold outdoor air needs time to reach thermal equilibrium. Until its optics and the surrounding air settle towards the same temperature, internal air currents can distort the image.
Allow sufficient cooling time before assessing image quality. Larger mirrors can take longer to reach equilibrium than smaller optical systems.
Focusing and magnification
Check that you’ve focused carefully and aren’t using more magnification than the telescope or observing conditions can support.
Increasing magnification makes an image larger, but it doesn’t necessarily reveal more detail. It can instead make atmospheric disturbances, focusing errors and optical limitations more obvious.
Should You Collimate Your Telescope If You’re Unsure?
If you’re unsure whether your telescope is misaligned, don’t start turning adjustment screws at random.
For a Newtonian reflector, begin with a suitable collimation cap or Cheshire tool and check the mirror alignment. If you own a Schmidt–Cassegrain or another design, follow the manufacturer’s recommended checking procedure.
If the alignment appears satisfactory and the telescope is otherwise performing well, further adjustment may be unnecessary.
The aim is to correct an identifiable alignment problem, not to adjust the optics simply because the image isn’t perfect.
4. What Tools Do You Need to Collimate a Telescope?
If you own a Newtonian reflector, you may be wondering whether you need specialist equipment to collimate it. The good news is that there are several options, ranging from a simple collimation cap to more specialised tools.
You don’t necessarily need to buy everything. The best choice depends on your telescope, how accurately you need to align its optics, and how comfortable you are with the process.
Let’s look at the main options.
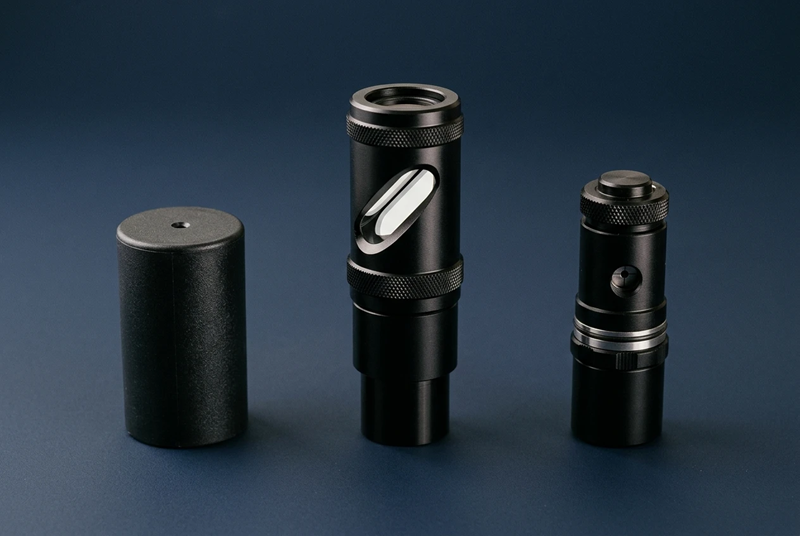
1. Collimation Cap
A collimation cap is a small cap that fits into the telescope’s focuser. It has a tiny hole in the centre, allowing you to look down the focuser and inspect the alignment of the mirrors.
It’s one of the simplest ways to begin learning about Newtonian collimation, and some telescopes are supplied with one.
Advantages
- Simple to use once you understand what you’re looking for.
- Inexpensive compared with more specialised tools.
- No batteries or electronics required.
Limitations
- It provides fewer visual reference points than a Cheshire or combination tool.
- Judging precise alignment can be difficult, particularly with faster Newtonian telescopes.
Best for: Beginners who want to inspect their telescope’s alignment without immediately investing in additional equipment.
A collimation cap can be a useful starting point, but its suitability depends on the telescope. For more precise adjustments, a Cheshire or combination sight-tube tool may be preferable.
2. Cheshire or Combination Sight-Tube/Cheshire Tool
A Cheshire tool provides visual references that help you check the alignment of a Newtonian’s mirrors.
A sight tube serves a related but different purpose: it helps you assess the position of the secondary mirror beneath the focuser and align the focuser’s optical axis with the primary mirror.
A combination sight-tube/Cheshire tool brings these functions together in one instrument, often making it a practical choice for someone learning the complete process.
Advantages
- Provides useful visual references for different alignment checks.
- Doesn’t require batteries.
- A combination tool can perform several functions without requiring separate instruments.
Limitations
- You’ll need to learn how to interpret the view through the tool.
- Correct use depends on selecting a suitable tool for your focuser and telescope.
Best for: Newtonian owners who want a practical tool for learning and checking mirror alignment.
For many beginners, a suitable combination sight-tube/Cheshire tool is a sensible long-term choice. It can help with more than one stage of the process without introducing the extra calibration considerations associated with a laser.
If you’re putting together your first collection of telescope accessories, take a look at our guide to Top Telescope Accessories for Beginners, where you’ll find more useful equipment to help you get the most from your telescope.
3. Laser Collimator
A laser collimator fits into the focuser and projects a narrow beam of light into the telescope. By observing where the beam falls on the primary mirror and how it returns, you can carry out certain alignment checks.
Laser collimators are popular because the beam is easy to see, and they can make some adjustments particularly convenient.
Advantages
- Makes it easy to see where the laser beam is directed.
- Can simplify checking and adjusting the secondary mirror’s tilt.
- Can be convenient when working in low light.
Limitations
- The laser itself must be accurately aligned.
- A basic laser collimator doesn’t replace every function of a sight tube or Cheshire.
- The accuracy of the result depends on the tool, how it fits the focuser and how it is used.
Best for: Newtonian owners who value the convenience of laser-based alignment and understand its limitations.
A laser can be a useful tool, but it isn’t essential for every beginner. If you choose one, follow its instructions and check that the laser is properly aligned before relying on its readings. A Cheshire can also be useful for independently checking the primary mirror’s alignment.
Safety note: Never look directly into a laser beam or down the telescope tube towards a laser source. Follow the manufacturer’s safety instructions.
4. Star Test: Checking Your Results
A star test isn’t a separate collimation tool, but it can help you assess the telescope’s optical performance after adjustment.
The process involves observing a suitable star, centring it in the field of view and moving the focuser slightly away from sharp focus. The resulting pattern can reveal signs of optical misalignment when interpreted correctly.
However, atmospheric turbulence, temperature differences within the telescope and other optical factors can affect the pattern. A star test is therefore best performed under suitable conditions and shouldn’t be treated as a definitive diagnosis based on one imperfect image.
For Newtonian reflectors, it complements rather than replaces the appropriate alignment checks using a collimation cap, Cheshire or other suitable tool. For Schmidt–Cassegrain telescopes, a star test is particularly important when checking and fine-tuning collimation according to the manufacturer’s procedure.
Collimation tools are just one part of a useful collection of observing equipment. If you’re putting together your first setup, our guide to Top Telescope Accessories for Beginners covers several other items that can help you get more from your telescope.
Which Collimation Tool Should You Choose?
| Tool | Main purpose | A sensible choice if… |
|---|---|---|
| Collimation cap | Basic visual inspection | You want to start simply or already have one |
| Cheshire or combination sight-tube/Cheshire | Visual checks of mirror positioning and alignment | You want a versatile tool for learning Newtonian collimation |
| Laser collimator | Convenient laser-based alignment checks | You prefer this approach and can verify the tool’s accuracy |
| Star test | Assessing optical performance under the stars | You want to check the results under suitable observing conditions |
For many beginners with a Newtonian reflector, a suitable Cheshire or combination sight-tube/Cheshire tool is a good starting point. A collimation cap may be sufficient for basic checks, while a laser can be a useful alternative or complement.
The important thing is to choose a tool that suits your telescope and learn how to use it correctly. More expensive equipment doesn’t automatically guarantee better results.
5. How to Collimate a Newtonian Telescope: Step by Step
Most Newtonian reflector telescopes, including the majority of Dobsonian telescopes, use two mirrors that need to be correctly aligned for the best possible views. This process is called collimation.
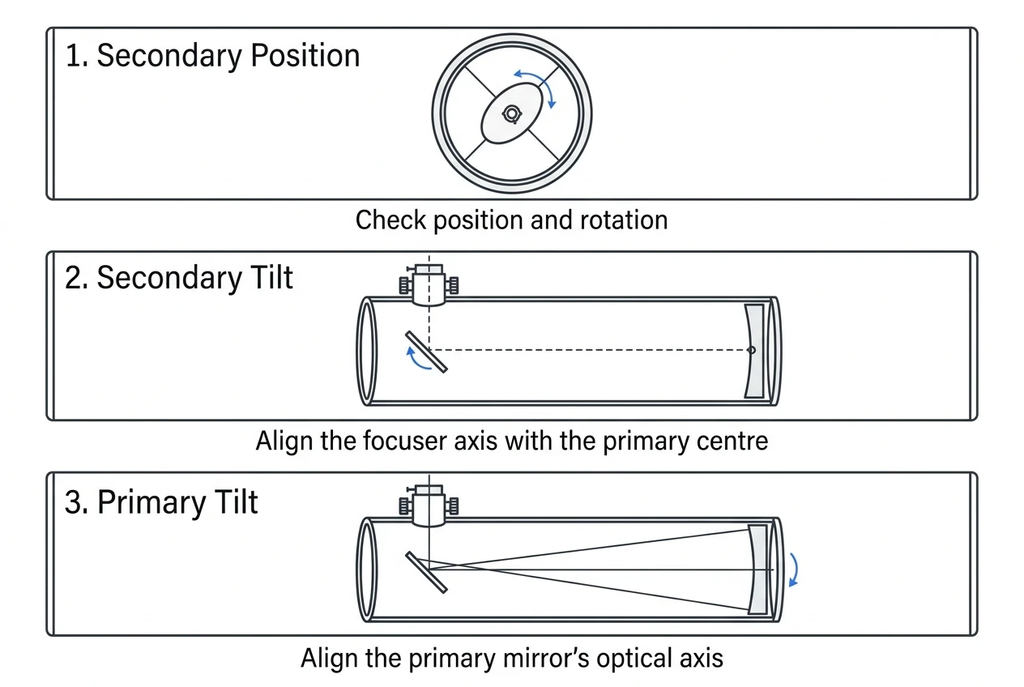
Newtonian collimation involves three distinct stages:
- Checking the position of the secondary mirror beneath the focuser.
- Adjusting the secondary mirror’s tilt so the focuser is correctly aligned with the primary mirror.
- Adjusting the primary mirror’s tilt to complete the optical alignment.
The first two stages are usually largely set-and-forget. Once correctly positioned, they don’t normally need frequent adjustment. The primary mirror is the one most commonly checked and adjusted, particularly after the telescope has been transported.
If you’re new to collimation, don’t be put off by the three stages. With a little practice, checking and adjusting a Newtonian becomes much more straightforward.
Step 1: Prepare Your Telescope
Before making any adjustments:
- Place your telescope on a stable surface.
- Allow the telescope to reach thermal equilibrium with the surrounding air, particularly if it has been stored indoors.
- Remove the eyepiece and insert your Cheshire, combination sight tube or other suitable collimation tool securely into the focuser.
- Make sure you understand how your particular telescope’s adjustment screws work. Consult the manufacturer’s instructions if necessary.
A well-lit indoor setting or daylight location is often convenient for checking alignment. Never point your telescope towards the Sun, even when using a collimation tool.
Step 2: Check the Secondary Mirror’s Position
Look through the sight tube towards the secondary mirror. The first check is whether the secondary mirror is correctly positioned beneath the focuser.
You want to see the secondary mirror appearing reasonably centred within the sight tube, with the primary mirror’s reflection visible in it.
This is a check of the secondary mirror’s physical position and rotation, rather than its tilt. If it is already correctly positioned, leave it alone.
Important: Don’t loosen the secondary mirror’s central bolt simply because the reflections don’t look perfectly concentric. Newtonian secondary mirrors are often deliberately offset, so their appearance can be slightly asymmetrical even when correctly positioned.
If the secondary mirror is significantly out of position, consult your telescope’s instructions before attempting to reposition it. This adjustment is more involved than routine collimation.
Step 3: Adjust the Secondary Mirror’s Tilt
Once the secondary mirror’s position is correct, the next stage is to adjust its tilt.
The aim is to point the focuser axis towards the centre of the primary mirror. Most primary mirrors have a small centre mark or centre spot to help with this.
Using a sight tube with crosshairs:
- Look through the tool and identify the primary mirror’s centre mark.
- Check whether the centre mark is aligned with the crosshairs.
- If necessary, use the secondary mirror’s small adjustment screws to make very small changes to its tilt.
- Recheck the view after each adjustment.
The goal is to bring the primary mirror’s centre mark into alignment with the sight tube’s crosshairs.
Take your time and avoid making large adjustments. If the secondary mirror is already correctly aligned, there is no need to disturb it.
Step 4: Adjust the Primary Mirror’s Tilt
This is generally the most frequently repeated stage of Newtonian collimation.
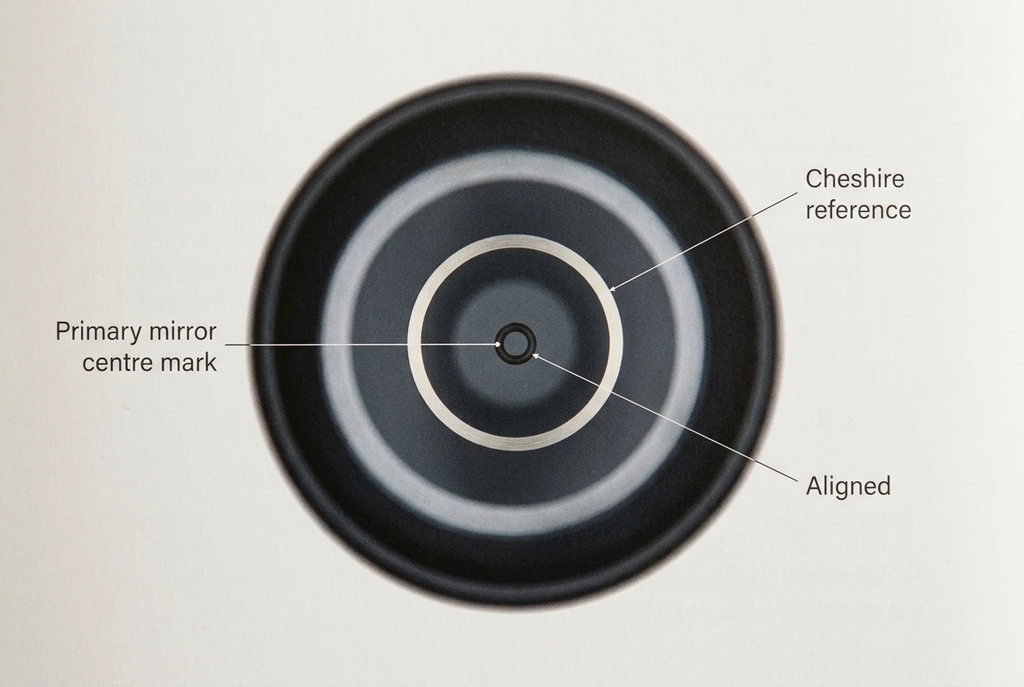
The aim is to align the primary mirror’s optical axis. A Cheshire collimator or combination sight tube/Cheshire is particularly useful for this.
Look through the Cheshire and locate the primary mirror’s centre mark. Adjust the primary mirror’s tilt using the adjustment screws at the rear of the telescope until the centre mark appears centred within the Cheshire’s reference circle.
Make small adjustments and check the view again after each one. The exact arrangement of adjustment and locking screws varies between telescope models, so follow the manufacturer’s instructions.
If using a basic laser collimator, be aware that relying only on the returning laser beam can give a misleading result if the secondary mirror is not correctly aligned. A Cheshire or Barlowed laser is generally a better way to check primary mirror alignment.
Step 5: Recheck the Alignment
Once the primary mirror has been adjusted, check the alignment again.
If you have adjusted only the primary mirror, the secondary mirror’s position and tilt should normally remain unchanged. However, if you have made changes to the secondary mirror, recheck the relevant earlier stages.
Make sure any locking screws are secured gently, where fitted, and check that tightening them hasn’t altered the alignment.
Remember that the aim is correct optical alignment, not necessarily to make every visible reflection appear perfectly concentric. The secondary mirror’s offset can make the view look slightly asymmetrical.
Step 6: Check the Result with a Star Test
A star test can provide a useful final check of your telescope’s optical alignment.
Choose a reasonably bright star, allow the telescope to reach thermal equilibrium and use a suitable magnification. Centre the star carefully, bring it into focus and then defocus it slightly.
You should see a pattern of light and dark rings around the star. A reasonably symmetrical pattern is a useful indication that the telescope is well aligned.
However, atmospheric turbulence, poor seeing and thermal currents can distort the pattern. If the image is unsteady, wait for better conditions before drawing conclusions.
The appearance of the pattern also depends on the telescope’s optical design and how far the star is defocused. Use the manufacturer’s guidance or a reliable star-testing guide if you need to interpret it in more detail.
A star test complements collimation tools; it doesn’t replace them.
Once your telescope is properly collimated, choosing an appropriate eyepiece is another important step towards getting sharp, detailed views of the night sky. Our guide to the Best Telescope Eyepieces for Stargazing explains the different options and what to look for.
A Final Word for Beginners
You don’t need to master every adjustment immediately. Start by learning how to check your telescope’s alignment with a collimation cap or Cheshire, and become familiar with what a correctly aligned view looks like.
In normal use, the primary mirror is usually the adjustment you’ll revisit most often. The secondary mirror’s position and tilt generally need attention much less frequently.
With a little practice, you’ll become more confident checking your telescope and making small adjustments when they’re genuinely needed.
6. How to Collimate a Schmidt–Cassegrain Telescope
Schmidt–Cassegrain telescopes (SCTs) are generally good at holding their alignment, so they usually need collimation less often than Newtonian reflectors. However, a small adjustment may occasionally be necessary, particularly if the telescope has suffered a knock or its views suggest an alignment problem.
Unlike a Newtonian telescope, an SCT is normally collimated by making small adjustments to its secondary mirror. The exact procedure varies between models, so check your telescope’s manual before making any adjustments.
Step 1: Check the Telescope’s Alignment
Before reaching for a screwdriver, allow your telescope to reach the temperature of its surroundings. Choose a clear night with steady atmospheric conditions, and select a reasonably bright star that is well above the horizon.
Centre the star in your eyepiece and bring it into focus. If the telescope is correctly aligned and the viewing conditions are good, the star should appear reasonably symmetrical. You can also defocus it slightly to examine the pattern of light around it.
If the pattern appears noticeably uneven, poor collimation is one possible explanation. However, atmospheric turbulence, temperature differences within the telescope and a star that is not centred in the field of view can also affect what you see.
Step 2: Make Sure an Adjustment Is Necessary
If the star test suggests a problem, repeat the check when the atmosphere is steadier, if possible. A single poor view is not necessarily evidence that your telescope needs collimation.
If the pattern remains noticeably asymmetrical under suitable conditions, consult your manual to confirm the correct adjustment procedure for your model.
Step 3: Make Small Adjustments to the Secondary Mirror
Many SCTs have adjustment screws on the secondary mirror assembly at the front of the telescope. These allow you to make very small changes to the mirror’s alignment.
The general approach is to make a tiny adjustment, recentre the star if necessary, and examine the pattern again. Repeat only as needed, following the instructions supplied with your telescope.
Keep these precautions in mind:
- Use the correct tool. Check your manual to find out which tool is required and how to access the adjustment screws safely.
- Make very small changes. A slight turn can make a noticeable difference, so avoid large adjustments.
- Do not loosen every screw indiscriminately. Follow the manufacturer’s procedure for your specific model.
- Keep the star centred. Assessing the pattern away from the centre of the field can give misleading results.
If you are unsure which screw to turn or how the adjustment mechanism works, stop and seek model-specific guidance rather than experimenting.
Step 4: Check the Result
After each small adjustment, examine the star again. The aim is to obtain a symmetrical pattern under good viewing conditions, with the star centred in the eyepiece.
When the pattern looks satisfactory, bring the star into focus and check the view. A properly aligned SCT should be capable of producing sharp, detailed images when atmospheric conditions, focus and the telescope’s temperature are also favourable.
A final word of caution: SCT designs differ, and some have specialised optical arrangements or adjustment procedures. If your telescope is an EdgeHD or another model with specific collimation instructions, follow the manufacturer’s guidance rather than assuming that a general SCT procedure applies.
7. Do Refractor and Maksutov Telescopes Need Collimation?
Not all telescopes need regular collimation. Refractors and Maksutov-Cassegrain telescopes are generally designed to hold their optical alignment well, so most owners will rarely need to adjust them.
However, both designs can develop alignment problems, and the best approach depends on the telescope’s construction.
Refractor Telescopes
Refractors use lenses rather than mirrors to gather and focus light. Most are aligned at the factory and require little routine maintenance beyond keeping the optics clean and the telescope properly focused.
If your refractor produces consistently soft images despite good atmospheric conditions, careful focusing and allowing the telescope to adjust to the surrounding temperature, a collimation problem is one possible explanation. However, other optical or mechanical issues may produce similar symptoms.
What should you do? Check the manufacturer’s guidance before attempting any adjustment. Some refractors have user-adjustable lens cells, but others do not. Adjusting the lens alignment without the appropriate knowledge can make matters worse, so professional advice is often the best option if you suspect a problem.
Maksutov-Cassegrain Telescopes
Maksutov-Cassegrain telescopes use a combination of lenses and mirrors in a compact optical design. They generally hold their alignment well and are not normally adjusted as part of routine observing.
Their collimation arrangements vary by model. Some have provisions for adjustment, while others are not intended for routine user collimation. The correct procedure may also differ from that used for a Schmidt–Cassegrain telescope.
What should you do? If your Maksutov consistently produces poor images and you have ruled out focusing, atmospheric conditions and temperature-related issues, consult the manufacturer’s instructions or contact a specialist before attempting to adjust the optics.
The Main Takeaway
For both refractors and Maksutov-Cassegrain telescopes, the safest approach is to leave the optical alignment alone unless there is a good reason to suspect a problem.
If you own a Newtonian reflector or Dobsonian, learning to check and adjust collimation is a useful observing skill. With refractors and Maksutovs, however, knowing when not to adjust the optics can be just as important as knowing how.
8. Common Telescope Collimation Mistakes to Avoid
Collimating a telescope becomes much easier when you understand what to look for and avoid making unnecessary adjustments. If you’re new to the process, these common mistakes are worth keeping in mind.
1. Adjusting the Mirrors When They Don’t Need It
Not every blurry view means your telescope needs collimation. Atmospheric turbulence, poor focus, excessive magnification and a telescope that hasn’t cooled to the surrounding temperature can all affect image quality.
What to do instead: Check the likely causes of a poor view before adjusting anything. If your telescope is producing sharp images, there is usually no reason to disturb its alignment.
2. Trying to Collimate Before the Telescope Has Cooled
A telescope taken from a warm house into cold night air may need time to reach thermal equilibrium. Until it does, temperature differences inside the instrument can distort the image and make it harder to judge the optical alignment.
What to do instead: Give your telescope time to adjust to the outdoor temperature before relying on a star test. The time required varies with the telescope’s design, size and the temperature difference.
3. Confusing Collimation with Focusing
Collimation aligns the optical components of a telescope. Focusing adjusts the image so that it appears sharp to your eye. They are different processes, and one cannot compensate for problems with the other.
What to do instead: Make sure you can achieve a good focus before concluding that collimation is the problem.
Before assuming that poor image quality is caused by miscollimation, make sure you’re using an appropriate eyepiece and have achieved accurate focus. If you’re unsure which eyepiece is best for your telescope, our guide to the Best Telescope Eyepieces for Stargazing can help.
4. Making Large Adjustments
Collimation adjustments are often surprisingly small. Turning an adjustment screw too far can move a mirror away from its correct position, leaving you with more work to do.
What to do instead: Make tiny adjustments and check the result after each one. Follow the procedure in your telescope’s manual, and never force a screw that feels stuck.
5. Assuming Every Telescope Is Collimated in the Same Way
Newtonian reflectors, Schmidt–Cassegrains, refractors and Maksutov-Cassegrains have different optical arrangements. A procedure that works for one design may be unsuitable for another.
What to do instead: Identify your telescope’s optical design and follow instructions intended for that type and, ideally, your specific model. If you’re unsure, seek advice before attempting an adjustment.
6. Trusting a Laser Collimator Without Checking It
A laser collimator can make checking a Newtonian telescope’s alignment more convenient, but the tool itself must be properly aligned. An inaccurate laser can give misleading results. In addition, the laser’s return beam alone may not provide a dependable primary-mirror alignment check in every setup.
What to do instead: Check that your laser collimator is properly aligned and follow its instructions. A Cheshire collimator or a suitable Barlowed-laser method can provide a more reliable reference for primary-mirror alignment.
7. Ignoring the Telescope’s Instructions
Different telescope models can have different adjustment mechanisms, and some optical systems are not designed for routine user adjustment. Guessing which screws to turn can cause unnecessary problems.
What to do instead: Read the manufacturer’s instructions before starting. If you cannot identify the correct adjustment points or are uncomfortable making the changes, stop and ask an experienced astronomer, telescope retailer or qualified technician for help.
The Most Important Rule
You don’t need to become an expert in optical alignment to get started. For many owners of Newtonian reflectors and Dobsonian telescopes, learning to check collimation with a suitable tool is a practical skill that can help maintain good views of the night sky.
9. Frequently Asked Questions About Telescope Collimation
It depends on the type of telescope and how it is used. Newtonian reflectors and most Dobsonian telescopes benefit from having their collimation checked regularly, particularly after being transported. You only need to make adjustments if the alignment is out. Schmidt–Cassegrain telescopes generally hold their alignment well, while refractors and Maksutov-Cassegrains rarely need routine adjustment.
Collimation may seem complicated at first, but checking the alignment of a Newtonian reflector is a skill most beginners can learn with practice. Start with a suitable collimation cap or Cheshire tool, follow your telescope manufacturer's instructions, and make small adjustments only when necessary. Other telescope designs may require different procedures.
Yes. A laser collimator is not essential. A collimation cap or Cheshire tool can help you check and adjust the alignment of a Newtonian telescope. These tools are often a good starting point for beginners and avoid the need to buy an electronic or laser-based device.
Poor collimation can reduce image sharpness and make it harder to see fine details, particularly when observing the Moon and planets at higher magnifications. Stars may also appear distorted or asymmetrical. However, similar symptoms can result from atmospheric turbulence, poor focus or temperature differences within the telescope, so check these possibilities before making adjustments.
No. You should check your telescope's alignment as needed rather than automatically adjusting it before every observing session. Newtonian reflectors and Dobsonians may need more frequent checks, especially after transport, but a telescope that remains correctly aligned does not need adjustment simply because you are using it again.
Most Dobsonian telescopes use Newtonian reflector optics, which means their mirrors need to be correctly aligned for the best performance. How often you need to adjust them depends on the telescope and how well it holds alignment. Checking collimation before observing, particularly after moving the telescope, is a sensible habit; adjustment is only necessary if the alignment is out.
10. Final Thoughts: Keeping Your Telescope Properly Aligned
Telescope collimation might sound technical, but understanding the basics can make a real difference to your observing experience. When your telescope’s optics are correctly aligned, you give your equipment the best chance of delivering sharp, detailed views of the Moon, planets and other celestial objects.
If you own a Newtonian reflector or Dobsonian, learning to check the mirror alignment is a worthwhile skill. A simple collimation cap or Cheshire tool can be enough to get you started, and you can build your confidence with practice. A laser collimator is another option, but it isn’t essential.
For Schmidt–Cassegrain telescopes, refractors and Maksutov-Cassegrains, the approach is different. These designs generally hold their alignment well, so avoid making adjustments unless you have good reason to suspect a problem. Always consult your telescope’s instructions before attempting to collimate it.
Above all, remember three simple principles:
- Check before adjusting. Blurry images do not automatically mean poor collimation.
- Make small changes. Follow the correct procedure for your telescope and avoid unnecessary adjustments.
- Be patient. Allow your telescope to reach thermal equilibrium and choose suitable viewing conditions when checking its alignment.
If you’re building your knowledge of telescope equipment, visit our Telescope Accessories hub for more practical advice on choosing and using the accessories that can improve your observing sessions.
With a little practice and the right approach, collimation can become a straightforward part of maintaining your telescope, helping you spend less time troubleshooting and more time enjoying the night sky.